Allocate employees to your locations
In this article we will show you how you can assign your employees to the locations, that you have created for the account and what implications that will have for your everyday work with Smartplan.
Dividing your employees onto your locations can make sense when you have quite a lot of employees created in Smartplan and choosing the right person from all the employees in each and every list has become too cumbersome for you.
It can also be useful if you want to prevent the employees to view and access information across locations. Allocating them to a set location will result in that they can only interact with the rotas and colleagues within their own location.
Finally, the allocation to locations is needed if you want to promote certain users to superusers and give them permission to handle certain areas of the system, like creating schedules or managing absences. More on this topic
here.
Let’s now look at:
How to assign your employees to locations
To activate the feature, head over to your „Settings“ -> „Smartplan Settings“ and then choose „Locations“ in the menu to the left. This is the place where you can manage your locations and location allocations.
Activate the check box saying „Enable that employees can be assigned to locations“.

Now that the feature is activated, it is time to distribute the employees onto the different locations. On what criteria you base the allocation of your employees is entirely up to you. The locations could represent different departments or stores in your company.
This article will guide you in finding a suitable account structure.
You will notice that a button with the label „Assign employees and superusers“ appeared. Click on it to edit the allocations for that specific location.
A ticked checkbox in the column „Assigned“ signifies, that this user is connected to the location:
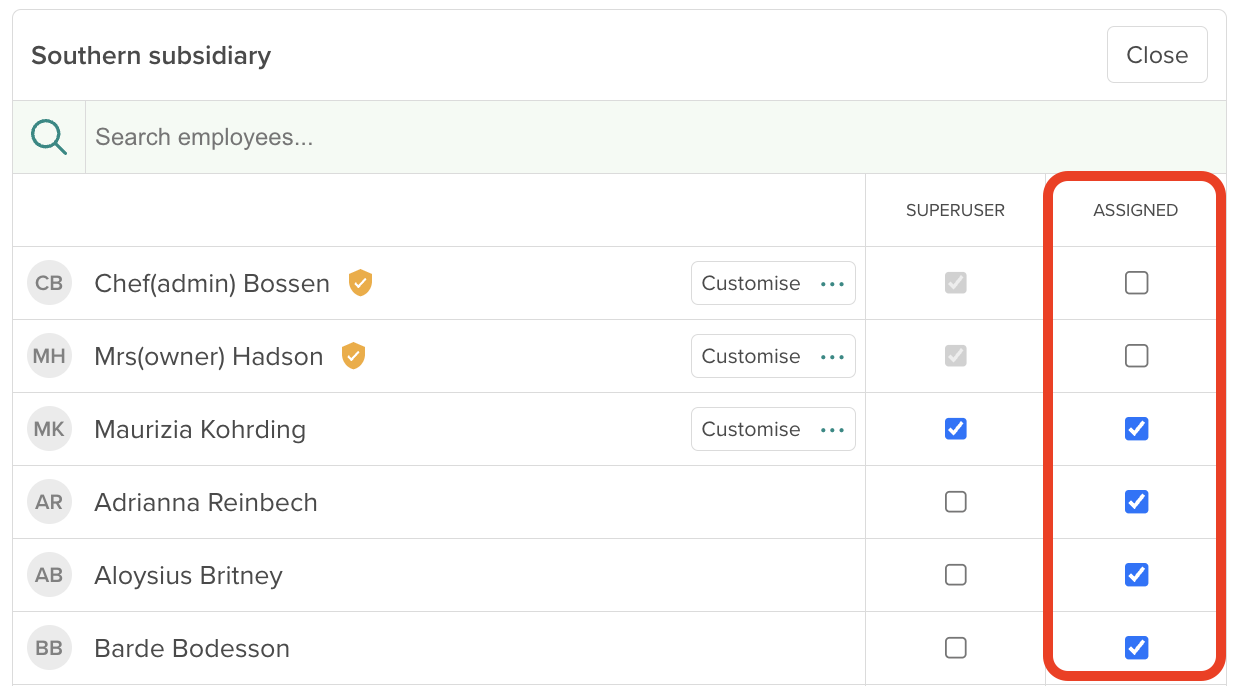
Any person that is an allocated user on the location can be additionally granted special permissions on this location. Just tick the checkbox in the „superuser“ column and then click on „customise“ to specify what rights the employee should receive. Read
this article to learn more about the superuser role.
Repeat the same process on the other locations. You can easily allocate the same employee to two or more locations, if they are taking part in the rotas of these locations.
The same goes for superusers as well. Imagine that you have four locations created: A, B, C and D. You allocated the employee Mark to the locations A, B and C. At the same time, you promoted Mark to a superuser on the locations A and B. This means that Mark will be treated as a regular user when accessing location C, but he will have special preset permissions when accessing location A and B. For example, you could give him permission to manage shift swaps in location A and edit the profiles of the users from location B.
Good to know: All your changes on this page are saved automatically. Even if you should deactivate the feature by accident, there is no need to worry. Your settings are saved in the background and will appear as soon as you activate the feature again.
What does the location allocation mean for you and your employees?
The employee allocations will be applied at various places throughout the entire system.
Rotas
Your employees will see all the locations and their published rotas. They can access them and look at them. But they can only take over shifts, swap shifts and hand in requests for the locations that they are connected to.
When you or a superuser are working on a schedule, the location division can ease your work by only showing you relevant information. When staffing a shift, you will only be presented with the people assigned to the location you are working on. The same goes for the employee rules. And rota templates will correspond to your connected locations, too.
Employee profiles
On the „Employees“ page, all the users on the profile will still be listed. However, to the left there will be the option to filter by location.
Superusers with the permission to manage users will be able to view all the users on the list, but only edit those profiles, whose locations they are connected to as a superuser.
Messages
It will still be possible to contact anybody on the account through the message center. The only difference will be, that when choosing the recipients of a message or when choosing who should be notified about activity on a thread, there will be the option to choose a location (meaning, all the people allocated to the location).
Absence
The absence calendar will show absences from all the locations on the account. The only difference will be for superusers, as they will only be able to view and handle absence requests for the employees of those locations, that they have been allocated to as a superuser. Additionally, when superusers are creating absences for other users, they are only presented with the people of their allocated location(s).
Hours & Salary
In case that a superuser has the right to edit attendance or salary information, he or she will have access to the „Hours & Salaries“ tab, but only be presented to the specific employees on the assigned location.
Notifications
Another big advantage is that all users on the account will only receive notifications about the locations that they are connected to. This goes for shift swap requests and absence requests as well: a superuser with permission to manage shift swaps will only be notified about those new shift swap requests that he is able and allowed to handle.
Punch Clock
The mobile Punch Clock will work as usual. But there is a difference in the browser Punch Clock. On top of your regular punch clock URL, that is allowing all the users of the account to punch in and out, you will also find specific Punch Clock URLs for each single location. Use these links to assure, that only the members of that location can punch in and out to their shifts. More on this topic here.
Good to know: Admins and account owners generally have access to and full control over all of the system. However, in the location settings, they can be allocated to certain locations as well. The reason for that is the notifications: Admins will only be notified about activities that are happening in the locations that they are connected to.
Restrict visibility between locations
Maybe you disagree with that your employees can access data from locations that they are not assigned to, for example because it may lead to friction within your staff or because you are concerned with the protection of data and privacy for your employees. In that case, you can isolate the locations even further.
Go back to your location settings and enable the following setting:
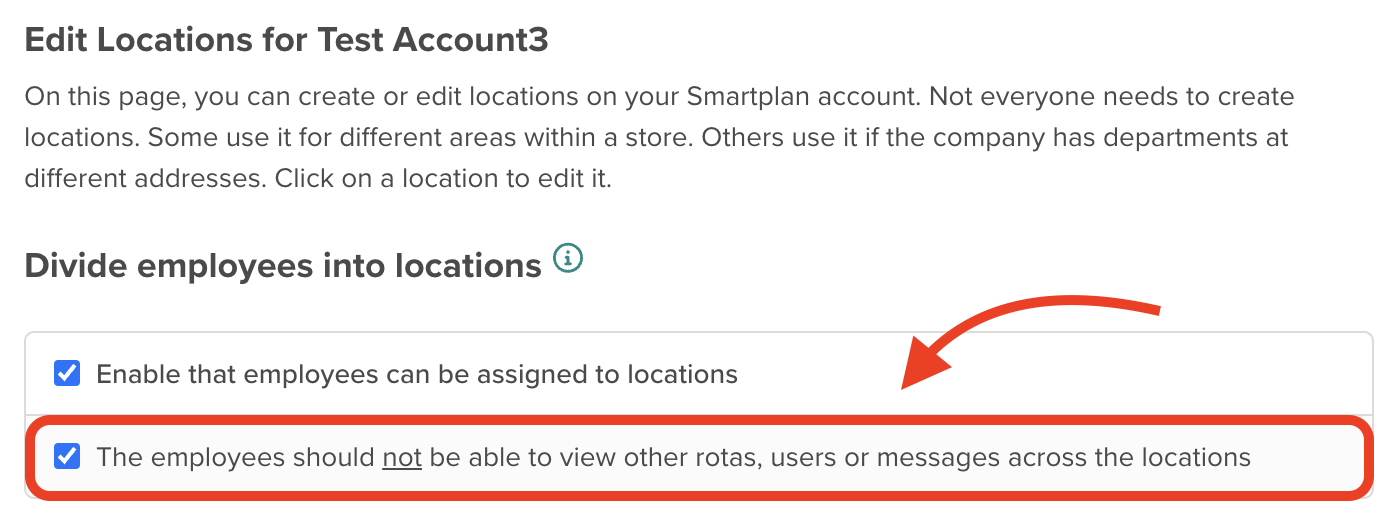
This means that both regular users and superusers will now only be able to view and interact with data on their own location(s). They will only be able to:
- view their own location(s) and rotas
- View profiles of the colleagues that belong to their location(s)
- Choose message recipients that are part of their location(s)
- Receive notifications on activity within their location(s)
- Punch in and out on shifts planned for their own location(s)
You can even go beyond that and restrict the visibility of data within the connected location(s). In the privacy settings, you can choose whether employees are allowed to see the absences and contact information of the other members in the location. More on this topic
here.
Note: Admins and account owners will of course still be able to view all the locations on the account. However, the system makes sure that mistakes are being avoided by only showing the admins the members of a location while composing a message or staffing a shift.


